
The carburetor retains your ATV or motorcycle running at the highest proficiency. A meaningly dirty carburetor will significantly disturb the performance of your bike to a point where it might halt working correctly. When that occurs, the first step you should take is to clean the carburetor. Carburetors are complex gears, but they should not make you feel daunted when it comes to the cleaning part. There is no need to evade cleaning your bike’s carburetor by going through the procedure thoroughly. Before taking the carburetor off and undoing it, you will have to pleat multiple gears. That’s why you need to know how to clean a dirt bike carburetor?
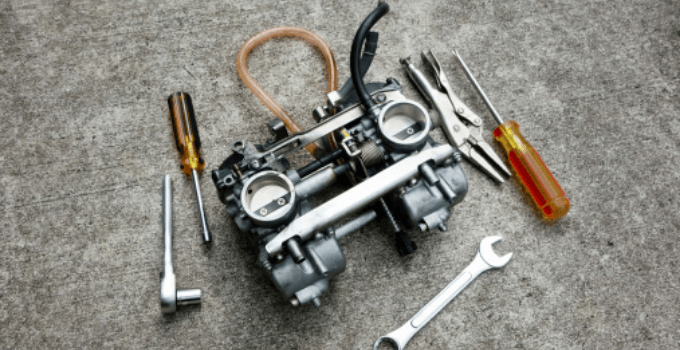
Tools You Required For Carburetor Cleaning
Protection is the first thing you will have to consider when cleaning a carburetor. Additionally, wearing safety glasses and gloves during the process will guard you against substances like gasoline which can annoy your skin. After getting these two items, you will have to confirm that your working area is clean and appropriately lit. Cleanliness is vital when undertaking classic bike work, but it is more critical when working on carburetors. Here is a list of some crucial gears which you have to mandatory for cleaning your dirt bike carburetor. These are as follows;
- The service manual
- Several rags
- Carburetor cleaner
- Hex key/Allen wrench
- Screwdriver
- Small screwdriver
- Socket wrench
- Wrench
- Compressed air
- Medium/low strength thread locker
- Gloves
These are the essential carburetor cleaning tools required for cleaning dirt bike carburetors.
Do you know how to clean the dirt bike air filter?
How Do You Know If The Carburetor Needs Cleaning?
A carburetor is a part of the internal ignition engine which controls the air and fuel mixture. Upkeep work on the carburetors is a threatening chore for novice riders and mechanics, not to mention that it’s an excellent way to harm something. Does your dirt bike have any challenging warning signs? There are quite a few signs when the carbon on your dirt bike is murky. Here are the most common symptoms of a dirty bike carburetor:
- The fuel tank already has a low level of gasoline.
- A massive quantity of smoke is out of the exhaust pipe.
- The engine swelters. Also, check if there is any strange odour with the vehicle, like hot oil.
- Problems with lazy speed and flat movement of the bike along the road.
- Engine loses power at high speeds. It could be produced by a blocked fuel line or other snags with the carburetor.
- Uneven idle and popping sound shadowed by a sharp upsurge in RPMs.
- Fuel ingesting is high while the deplete smoke is white. This symptom means too much air in the air fuel mix, which can occur if some parts of your vehicle are out of order.
- The engine overheats after driving for a long time.
- Your bike is releasing black smoke out of its drain pipe, which means that you have fuel problems.
- The air filter needs to be swapped directly; it is worth stating that air filters work most proficiently when they are comparatively new or have not been used for a long time.
How To Clean A Dirt Bike Carburetor Step By Step Guide?
The dirt bike carburetor is a crucial part of the engine that panels air and fuel mixture. Dirt bikes ride off road, which means mud, grit, gravel, and other atoms can get into the carburetor and clog it up. This will cause your machine to pop or arcade when you ride it. Cleaning a dirt bike carburetor yourself without taking it off is imaginable with this hasty guide.
Cleaning a dirt bike carburetor is not easy, but it doesn’t have to be as problematic as you think. Dirty or blocked carbs can result in contracted throttle retort and power output. Read on for tips and tricks that will help make this horrid job calmer.
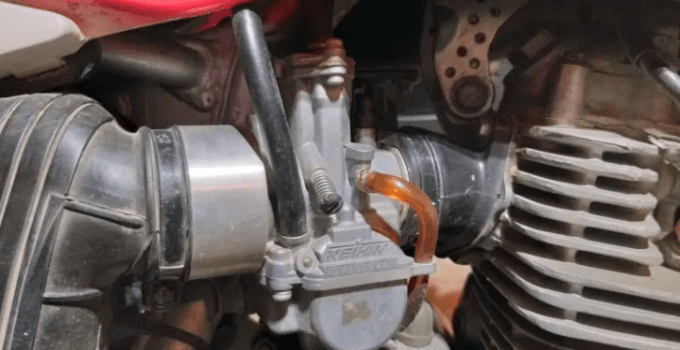
Step1: Take Off The Fuel Line
A great way to start your day is by cleaning it from work. The first thing you need before taking a break or separating any twines in your home, though, are those irritating gas lines. You can do this effortlessly enough with just two hexagons bolts, one on either side at the base.
Step2: Take Off The Air Filter Cover
Before repairing your vehicle, the first thing you need to do is eliminate dust and wreckage from inside it. The cover on these filters defends them, but they also have a place in shielding while driving so we don’t gasp too much aerial trash. To release this lock, use an adaptable wrench until all three hexagonal screws are loose enough that their covers can be pulled away, then set those sideways for future use. Hence after that, you have to take off your air filter cover. Again, use a screwdriver to untie the hexagon bolts that hold it in place. Then eliminate them and set these parts aside for later use.
Step3: Take Away The Carburetor
After these steps, you can lastly remove the carburetor. Make sure that you place the parts on a clean surface to make it easier for you to classify them later on. With another screwdriver or opening, the wrench loosens up the lower nut and bolts on the clog cable at first. Make sure that you do this with great attention and care. Then, use the same instrument to loosen up the upper nut and bolt on the accelerator cable. When you do this, make sure that your wrench is on top of the nut’s head, then turn it circular. You can also use spine nose pliers for good performance if you want to add a little effort to them.
Step4: Remove The Carburetor Gasket
Carburetor gaskets are a vital part of your engine’s system as they stop air from dripping into it. A separate carburetor gasket will help prevent leakages by discontinuing airflow, causing lubrication glitches between several stirring apparatuses within the combustion slot. After that, you should eliminate the carburetor gasket by using your hands first and then fix off any dirt or wreckage left behind on its surface. Recruit a small flathead screwdriver for this task if you find it firm to do with just your hands.
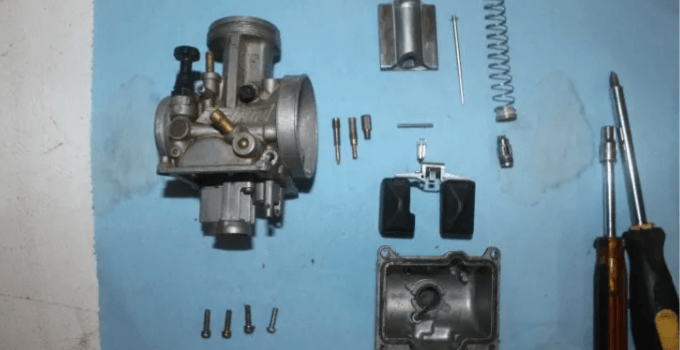
Step5: Remove The Carburetor Body
Now you only need to remove the carburetor body by dragging it. Be cautious not to break any parts along its way because this will make amassing it later more problematic than customary. When you do this, make sure you pay great attention to where each part is positioned for a calmer reassembly procedure.
Step6: Clean The Carburetor Parts
Finally, clean all parts of your carburetor using a piece of soft fabric and carb detergent. Do not use abrasives or punitive substances to clean it because they can harm its metal finish. By succeeding in these phases on how to clean dirt bike carburetor without taking it off, you will be able to do so in a breeze. Be vigilant while handling each part, and do not force anything because you can break your bike’s carburetor this way.
How Much Does It Cost To Clean A Dirt Bike Carburetor?
Reliant on what bike and carb you have, a carb clean will cost you around 50-100 bucks. On the higher end of the shop, you give it to eliminate the bike’s carb. It’s inexpensive if you confiscate the carb and hand it to them.
Do you know how to clean a dirt bike engine?
How Do I Keep The Carb Clean Long-Term?
Here are five simple tech tips on how to prevent your dirt bike’s carburetor from getting dirty:
Ride more often: Yep, if all you do is ride more often, the gas is less likely to gum up and twig in the carb. Gas can go wrong in weeks because of all the extracts these days.
Use better gas: Regular pump gas has ethanol, which entices water 100x more than non-ethanol gas. Water is highly harsh when it sits in your carb. If possible, use non-ethanol pump gas, and your carb will stay cleaner for longer.
Don’t use harsh solvents: Using carb cleaner or any punitive flush on rubber or gasket material will ultimately decay your carb. If you use chemicals to clean it, use something easy on the materials, such as simple green.
Use fresh gas: Since pump gas breaks down and goes terribly from sitting, it’s best to use new gas when you ride. Fresh gas will usually give you a better throttle response and somewhat more power than old gas.
Filter the gas: The petcock in the gas tank has a filter, but sometimes dirt and grease get passed it. Adding a fuel filter in line with the fuel line to the carb will filter out any more junk. We endorse this if you ride in an area that often gets dirty gas.
Do you want to change your dirt bike tire? you must have the right dirt bike tire changing tools.
Conclusion
You can keep your dirt bike’s carburetor in decent form by cleaning it with specific crops. Clean carburetor assists in upholding your bike’s engine power and gas mileage. We hope this article will help you understand every step of cleaning a dirt bike carburetor.


")

